Chocolate Babka
Beth LeeThis brioche-like chocolate filled rolled pastry is worth every step it takes to make it. Ideally, the dough should stand overnight but in a pinch, you could pull this together in a day. And the recipe yields two loaves, so your efforts will stretch over many beautiful slices of this krantz cake or more commonly called babka.
Ingredients
Dough
- 4¼ cups flour plus extra for dusting
- ½ cup superfine sugar I used regular and it was ok
- 2 teaspoon fast-rising active dry yeast I used a 2 ¼ teaspoon packet
- grated zest of 1 small lemon I’ve done this w orange and lemon – think I prefer the brightness of the lemon
- 3 extra-large free-range eggs
- ½ cup water
- ½ teaspoon salt
- ⅔ cup unsalted butter 11 tablespoons, at room temperature, cut into ¾-inch cubes
Note - be sure to cut into cubes before it becomes room temperature!
- unflavored oil such as vegetable or canola or grapeseed for greasing
Chocolate Filling
- scant ½ cup confectioners’ sugar
- ⅓ cup best-quality unsweetened cocoa powder
- 4½ oz good-quality dark chocolate melted
- ½ cup unsalted butter melted
- 1 cup pecans coarsely chopped
- 2 tablespoon superfine sugar regular works here too
- Cinnamon for sprinkling optional
Syrup
- ⅓ cup water
- ⅝ cups superfine sugar
Instructions
Make the dough:
- In your stand mixer fitted with the dough hook, place the flour, sugar, yeast, and lemon (or orange) zest and mix on low speed for 1 minute to combine the ingredients. Add the eggs (have these ready to go in a bowl so you can just pour them in) and water and mix on low speed for a few seconds, then increase the speed to medium and mix for 3 minutes, until the dough comes together. Now add the salt and then the butter, a few cubes at a time, mixing until it is incorporated into the dough. Continue mixing for about 10 minutes on medium speed, until the dough is completely smooth, elastic, and shiny. You should scrape down the sides of the bowl once or twice while it is mixing. If a lot of dough is clinging to the sides of the bowl, throw in some flour to help release all the dough from the sides.
- Once it is smooth, elastic, and shiny, place the dough in a large bowl brushed with vegetable or canola oil, cover with plastic wrap, and leave in the fridge for at least half a day, preferably overnight. Important note here: Don’t expect it to rise much in the fridge – it will probably rise by about half – definitely not double. Don’t be concerned. If it doesn’t seem to have risen enough – take it out of the fridge and let it sit on the counter or even in a warmer proofing type environment for a bit – it will grow a little more. You don’t want it doubled. Don’t overproof or over worry )
Prepare the two babka loaves:
- Grease two 2¼-lb (9 by 4 inches or standard American size will work just fine) with some oil or just spray with whatever non-stick spray you use. Then cut a piece of parchment to line the pan and make it wide enough to overlap each side and create “handles” so when the babka is done, you can just pull it right out of the pan.
- Make the filling by mixing together the confectioners’ sugar, cocoa powder, chocolate, and butter. (Note here: I melted my chocolate and butter together in my microwave on the melt function. The chocolate melted a bit faster but by mixing them vigorously, it all came together and became a lovely shiny ganache like mixture.) You will get a spreadable paste once you add the sugar and cocoa powder to the butter/chocolate mixture.
- Divide the dough in half and keep one-half covered in the fridge. Each half should be about 19 ounces each if you are one to measure and not just eyeball.
- Roll out the dough on a lightly floured surface into a rectangle measuring 15 by 11 inches. Don’t get crazy here – anything close to this size is fine. Position the dough so that a long side is closest to you. Using an offset spatula if you have one, spread half (about ⅝ cup) of the chocolate mixture over the rectangle, leaving a ¾-inch border all around. Sprinkle half the pecans and the sugar over the chocolate. (if you plan to use cinnamon as well you can sprinkle on now or have it already mixed into the sugar and sprinkle the mixture all over the chocolate.)
- Have a little bowl of water handy and use a small pastry brush or your finger to brush a little bit of water along the long end farthest away from you.
- Use both hands to roll up the rectangle like a roulade or as I like to think about it, a sushi roll. Start from the long side that is closest to you, start rolling gently but firmly, get the first roll started then check as you go along that you are keeping it tightly rolled along the whole length of dough. Repeat the rolling until you reach the other long end. Press to seal the dampened end onto the roulade and then use both hands to even out the roll into a even cylinder and turn it around so it is resting on its seam.
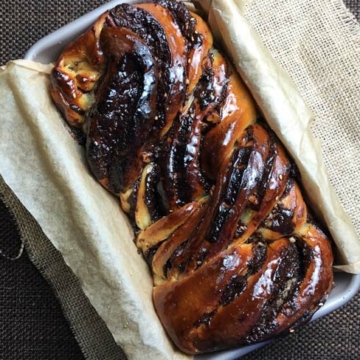
- Trim about ¾ inch off both ends of the cylinder with a serrated knife. Use the serrated knife to gently cut the roll into half lengthwise (yes that’s right – lengthwise), starting at the top and finishing at the seam. This is where you’ll be glad you rolled it tightly but if the layers separate a bit, don’t panic. It’s going to be ok. You’ll end up with two halves revealing all the layers of dough and filling. With these cut sides facing up, press together one end of both halves, and then lift the right half over the left half and repeat this until there is no more dough left. Press together the dough at the finished end. Now you should see a twist with the filling and layers showing on top. Carefully lift the cake and place it into the prepped loaf pan. If it is a bit too long, just snug it in. It will be fine. Cover the pan with a wet dish cloth or tea towel and leave to rise in a warm place for 1 to 1½ hours. The cake will rise by 10 to 20 percent. Repeat the whole process to make the second cake. If you have to leave like I did while the cakes are in the second rise, be sure to put them in the fridge to slow the rise. I left them too long during one of my bakes and they overproofed a bit – almost doubled in size. I think they turned out ok but it threw off the bake a bit and possibly the texture of the bread.
Bake the cakes:
- Preheat the oven to 375°F when the cakes are nearly done with their second rise. Remove the tea towels, place the cakes on the middle rack of the oven, and bake for about 30 minutes, until a skewer inserted in the center comes out clean.
Make the syrup:
- While the cakes are in the oven, make the syrup. (Note that I halved the amount of syrup that the original recipe tells you to make. I used nearly ⅔ of the original amount the last time I made the babka and just found it to be too much.) Combine the water and sugar in a saucepan, place over medium heat, and bring to a boil. As soon as the sugar dissolves, remove from the heat and leave to cool down. As soon as the cakes come out of the oven, brush all of the syrup over them. Leave the cakes until they are just warm, then remove them from the pans and let cool completely before serving.
Notes
Adapted from Jerusalem: A Cookbook by Ottolenghi and Tamimi
Remember those pieces you cut off the ends of the rolls? Don't throw them out - bake them - they make a yummy little snack!
You can store these on the counter for a couple days well wrapped or they can be frozen. I like to toast a slice once it's a couple days old - yum!
Nutrition
Calories: 422kcalCarbohydrates: 50gProtein: 6gFat: 22gSaturated Fat: 11gCholesterol: 66mgSodium: 89mgPotassium: 163mgFiber: 3gSugar: 21gVitamin A: 460IUVitamin C: 0.1mgCalcium: 26mgIron: 3mg
Tried this recipe?Let us know how it was!